CICD pipeline with gitlab
why gitlab is better?
- for jenkins we need to setup master and slave nodes which need 2 VMs
- we also need to store our codebase in github or gitlab additionally and then connect it to jenkins
- gitlab cicd is better because we can directly store and deploy our code using gitlab itself
- gitlab provides shared runner and private runner
- shared runner - this is free provided by gitlab but we cannot access the VM
- private runner - this should be created by us (ex- VMs, k8s pod etc)
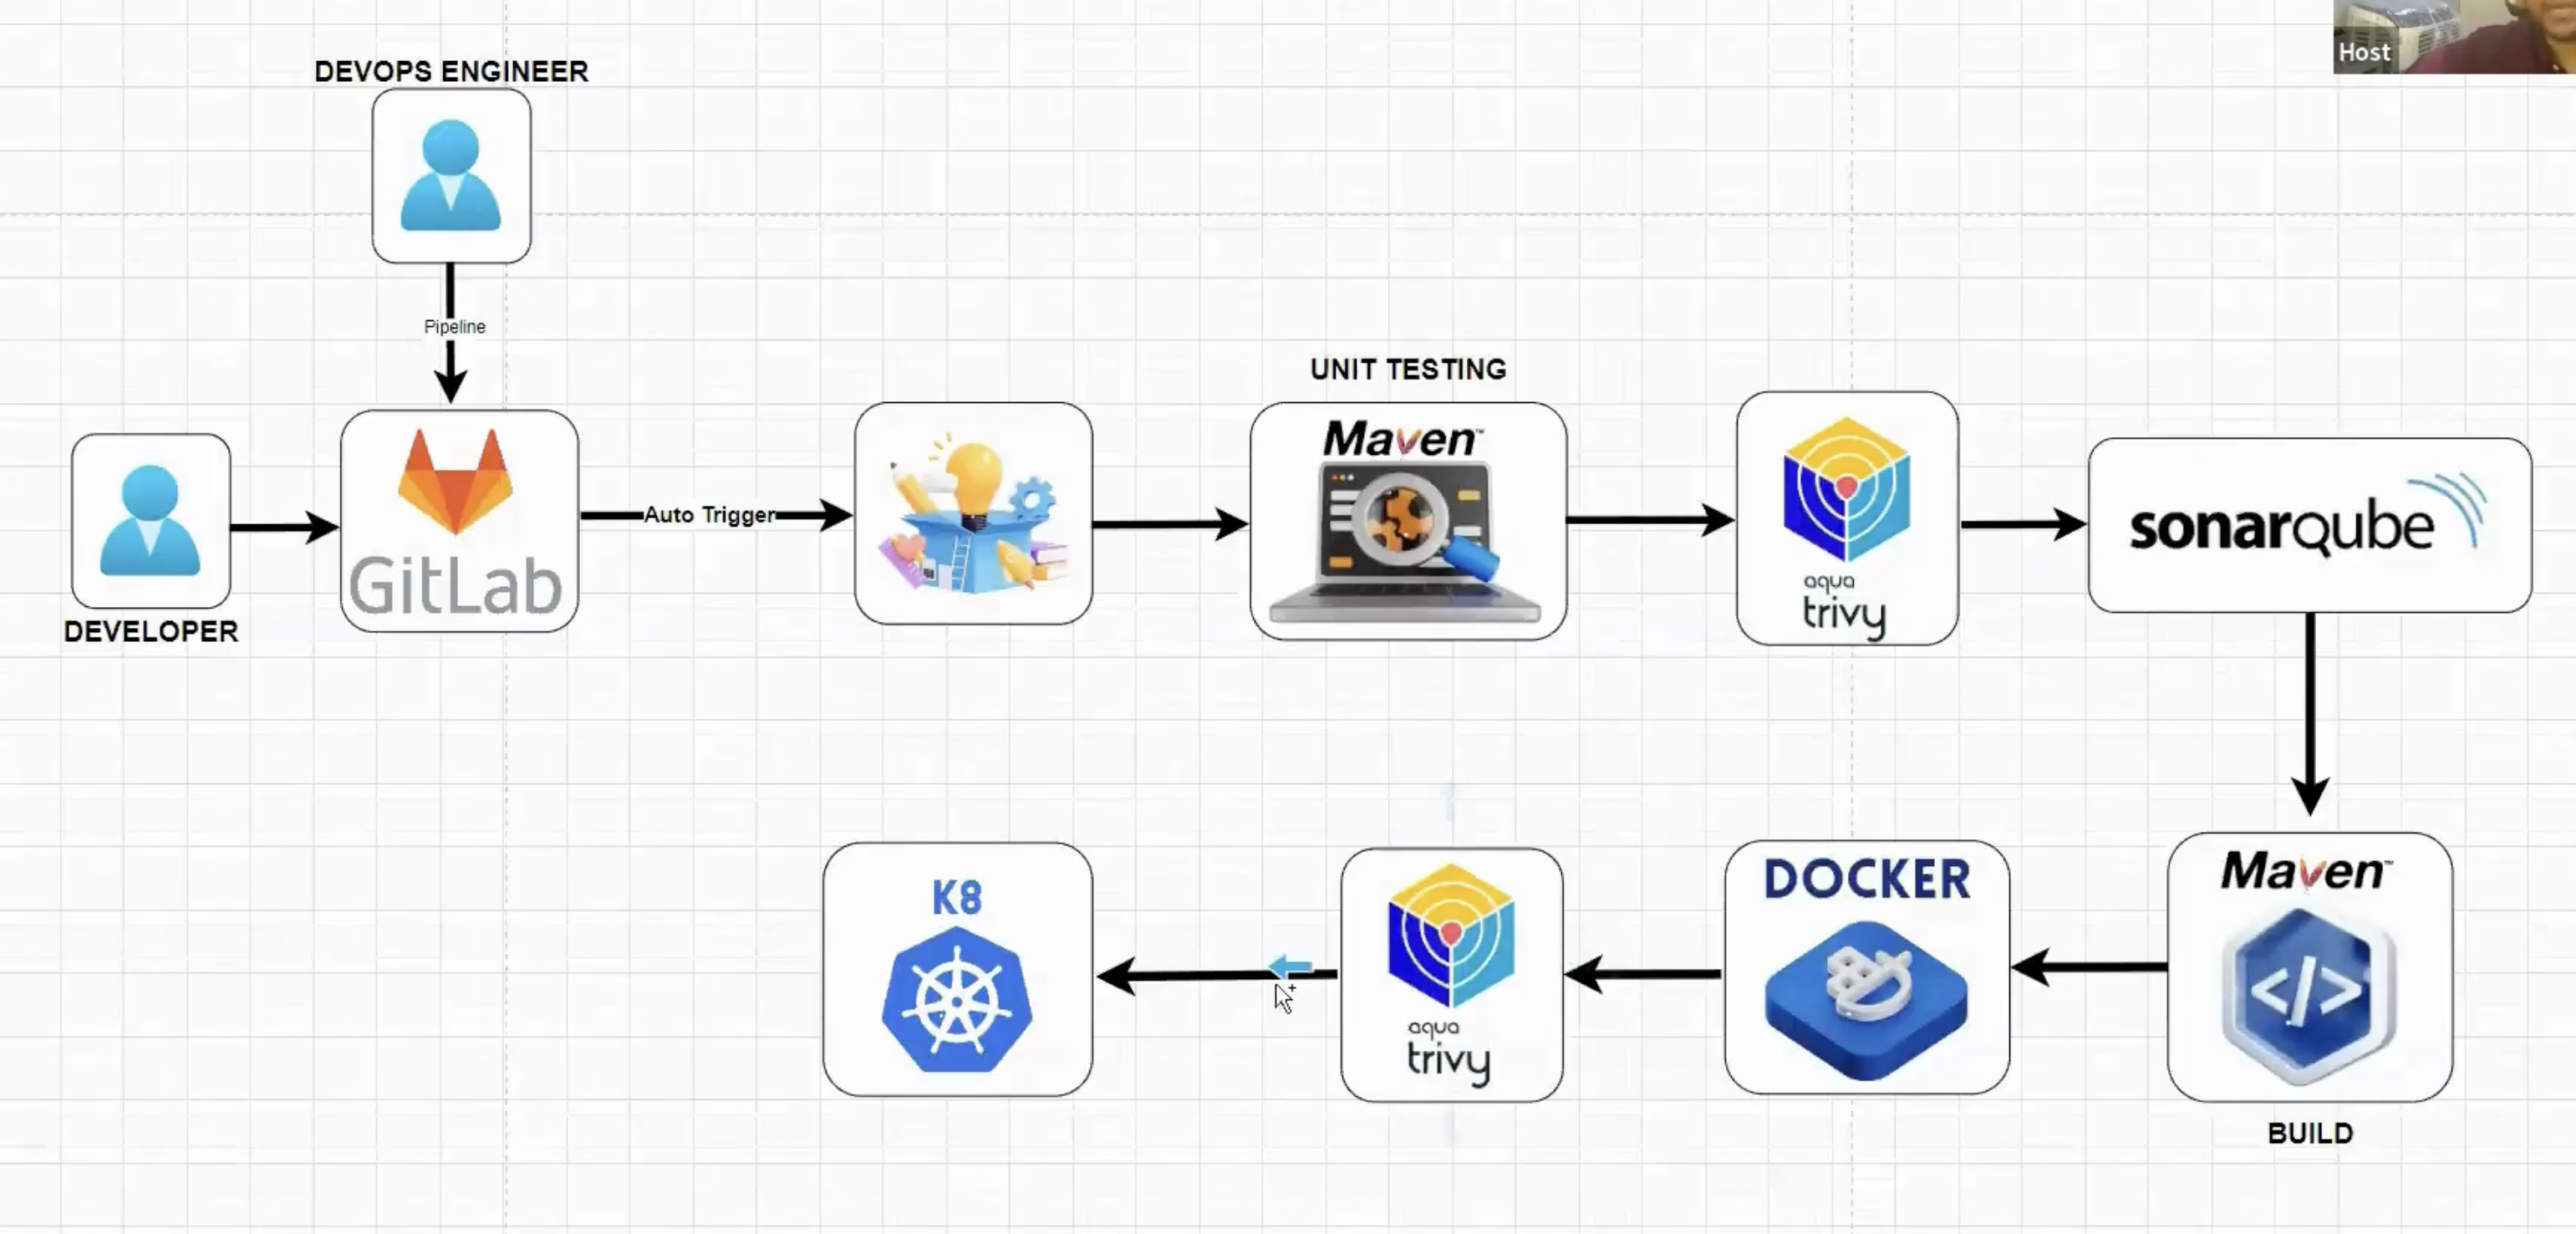
- step-1: create the repository in gitlab with the project for this example I used this java spring boot app - https://gitlab.com/aniketpathak/Boardgame
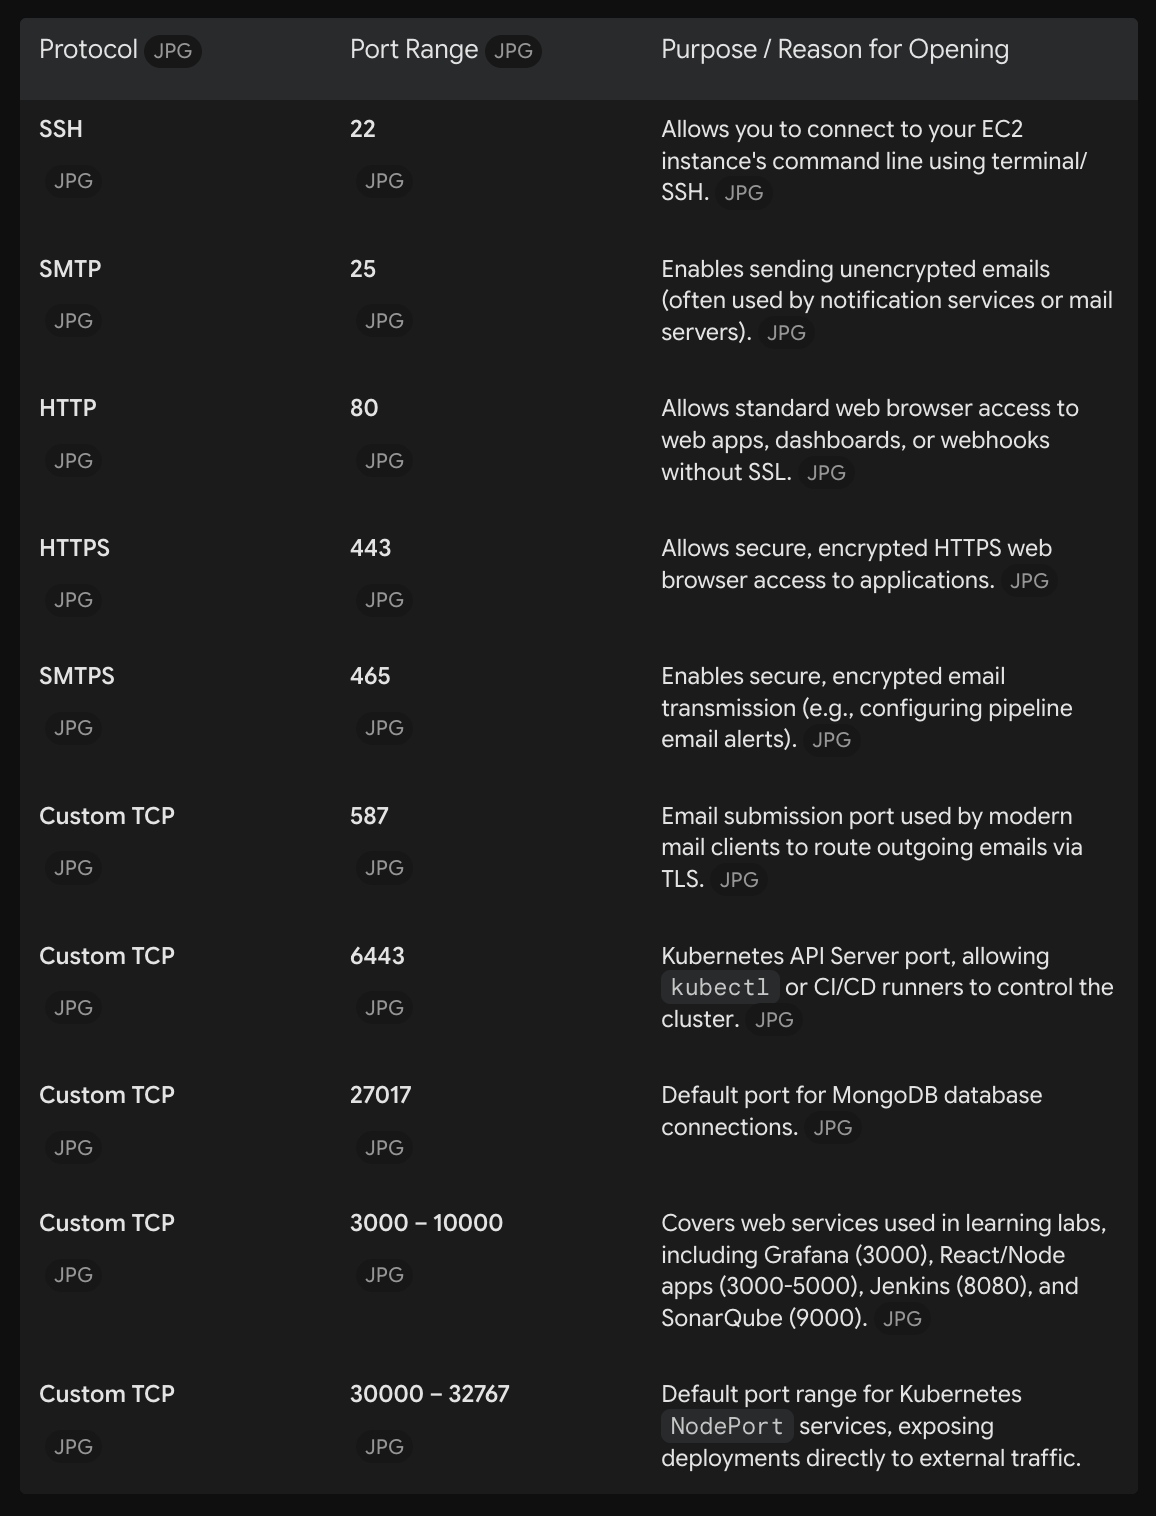
- step-2: create a VM in any cloud platform (AWS, GCP or Azure) here I create an EC2 instance on AWS and create a security group with the following inbound rules, and attach this group to my instance, also do not forget to add outbound security rule!
how to use a runner?
- go to the repository settings > ci/cd > runners > create project runner
- connect to your ec2 instance on AWS using ssh
- install gitlab-runner in the vm and register it with gitlab using the code snippet in gitlab
- once it shows green symbol, the runner is registered!
chmod 400 secret.pem
ssh -i secret.pem ubuntu@<ip-address>
sudo apt update

# now install the gitlab-runner to this vm using the commands from gitlab
# register it with the gitlab runner using the code snippet
gitlab-runner run
create a pipeline
- once the runner is set up, go to gitlab project > build > pipeline editor and create a new pipeline
- in the pipeline we will define stages and jobs that will be automatically triggered when we push code changes to gitlab
- a simple pipeline to install necessary dependencies and tools in the VM and run unit tests:
stages: # List of stages for jobs, and their order of execution
- install_tools
- test

install_mvn_trivy_docker_kubectl:
stage: install_tools
script:
- sudo apt install openjdk-17-jre-headless -y
- sudo apt install maven -y
- sudo apt-get install wget gnupg -y
- wget -qO - https://aquasecurity.github.io/trivy-repo/deb/public.key | gpg --dearmor | sudo tee /usr/share/keyrings/trivy.gpg > /dev/null
- echo "deb [signed-by=/usr/share/keyrings/trivy.gpg] https://aquasecurity.github.io/trivy-repo/deb generic main" | sudo tee -a /etc/apt/sources.list.d/trivy.list
- sudo apt-get update && sudo apt-get install trivy -y
- sudo apt install docker.io -y && sudo chmod 666 /var/run/docker.sock
- sudo snap install kubectl --classic

tags:
- runner-ec2

unit_testing:
stage: test
script:
- mvn test

tags:
- runner-ec2- once the basic pipeline works we need to install sonarqube in our vm using docker and start the sonarqube server and access it using {ipaddress}:9000
- by default the username and password is admin, once you login you are prompted to change the password again
docker run -d -p 9000:9000 sonarqube:lts-community - once sonarqube opens import the gitlab project using Personal Access Token from Gitlab by enabling proper rights and then we can add sonarqube also in our pipeline under security stage
Add environment variables for sonarqube in gitlab ci
-
Define the SonarQube Token environment variable. In GitLab, go to Settings > CI/CD > Variables to add the following variable and make sure it is available for your project:
- In the Key field, enter
SONAR_TOKEN - In the Value field, enter an existing token, or a newly generated one: Generate a token
- Uncheck the Protect Variable checkbox.
- Check the Mask Variable checkbox.
- In the Key field, enter
-
Define the SonarQube URL environment variable. Still in Settings > CI/CD > Variables add a new variable and make sure it is available for your project:
- In the Key field, enter
SONAR_HOST_URL - In the Value field, enter
http://localhost:9000 - Uncheck the Protect Variable checkbox.
- Leave the Mask Variable checkbox unchecked.
- In the Key field, enter
- also add the paths for the necessary dir in gitlab project repo inside sonar-project.properties:
sonar.projectKey=Boardgame
sonar.projectName=Boardgame
sonar.sources=src/main
sonar.tests=src/test
sonar.java.binaries=target/classes
sonar.qualitygate.wait=true
for ex- here the java binaries are stored in target/classes
setting up own self-hosted k8s cluster
- create 2 VMs - 1 slave and 1 master in any cloud platform
- run the following code in the VMs after connecting to them via SSH:
sudo apt-get update
sudo apt install docker.io -y
sudo chmod 666 /var/run/docker.sock
sudo apt-get install -y apt-transport-https ca-certificates curl gnupg
sudo mkdir -p -m 755 /etc/apt/keyrings
curl -fsSL https://pkgs.k8s.io/core:/stable:/v1.30/deb/Release.key | sudo gpg --dearmor -o /etc/apt/keyrings/kubernetes-apt-keyring.gpg
echo 'deb [signed-by=/etc/apt/keyrings/kubernetes-apt-keyring.gpg]
https://pkgs.k8s.io/core:/stable:/v1.30/deb /' | sudo tee
/etc/apt/sources.list.d/kubernetes.list
sudo apt update
sudo apt install -y kubeadm=1.30.0-1.1 kubelete=1.30.0-1.1 kubectl=1.30.0-1.1- run this for the master node:
sudo kubeadm init --pod-network-cidr=10.244.0.0/16- this creates a token and a range of ip addresses that would be used for creating the pods in the cluster, once we run this on the master node it will generate another command which we need to run on the slave node to make it a part of the k8s cluster
- create a dir for the kube config file in master node:
mkdir -p $HOME/.kube
sudo cp -i /etc/kubernetes/admin.conf $HOME/.kube/config
sudo chown $(id -u):$(id -g) $HOME/.kube/config- run these to setup calico and ingress-nginx for networking
kubectl apply -f https://raw.githubusercontent.com/projectcalico/calico/v3.28.3/manifests/calico.yaml

kubectl apply -f https://raw.githubusercontent.com/kubernetes/ingress-nginx/main/deploy/static/provider/baremetal/deploy.yaml- now we have 3 nodes, a runner vm, a k8s master and a k8s worker, we can simply put the k8s config file (kubeconfig) in the .kube folder of our runner so that it can authenticate with the cluster and deploy our application into the cluster
- for security reasons we will encode the kubeconfig file into base64 and when using it we will decode it and use the same during authentication
Links:
202609191631