In this blog, we are going to learn how to build an Azure CICD pipeline using Azure DevOps by implementing it for a real time voting app - , this is a sample microservices app built by the docker team which implements the principles of distributed systems mimicking a real life scenario. We will deploy this app into Azure Devops and create CI-CD pipelines for the microservices. Let’s get started!
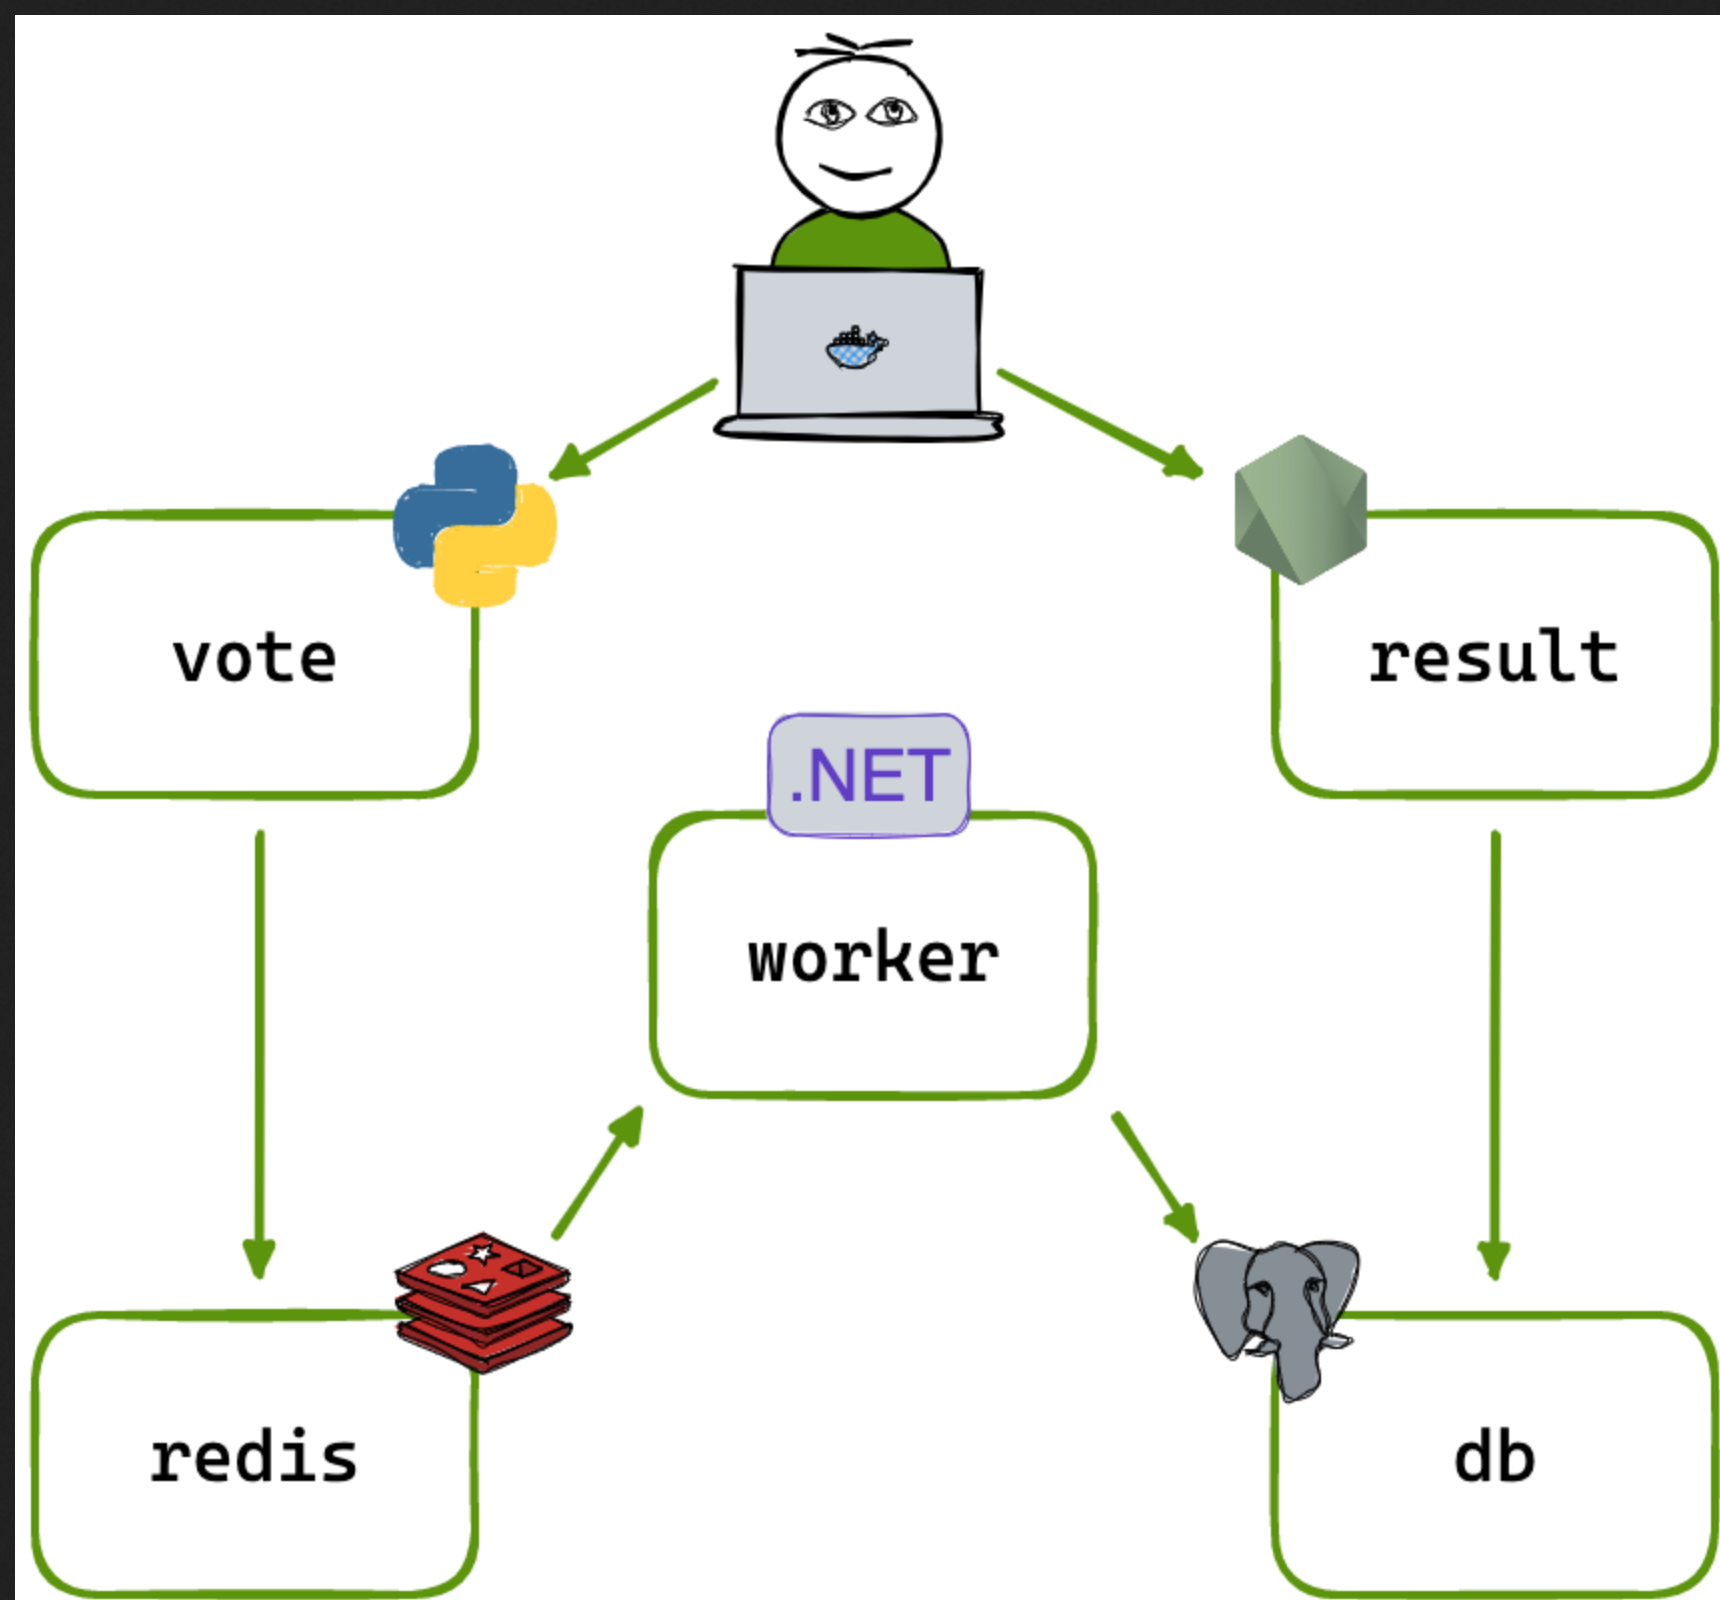
Architecture - Voting app
The github repo has a comprehensive architecture explanation but in short there are 3 microservices in this application:
a voting microservice written in Python that let’s users vote
a worker microservice that writes the in memory data from redis DB to a persistent Postgress DB written in .NET
a result microservice written in Node.js that displays the live results of the poll
Fork the repo and clone it locally and run docker compose up to test the app locally!
Now that we have a rough idea of the architecture, we can get started!
Continous Integration
Step-1: Azure DevOps and Azure account
Make sure you have an Azure DevOps (https://dev.azure.com) and a Microsoft Azure (https://portal.azure.com) account! Both are different and it is always better to have a single microsoft account on both!
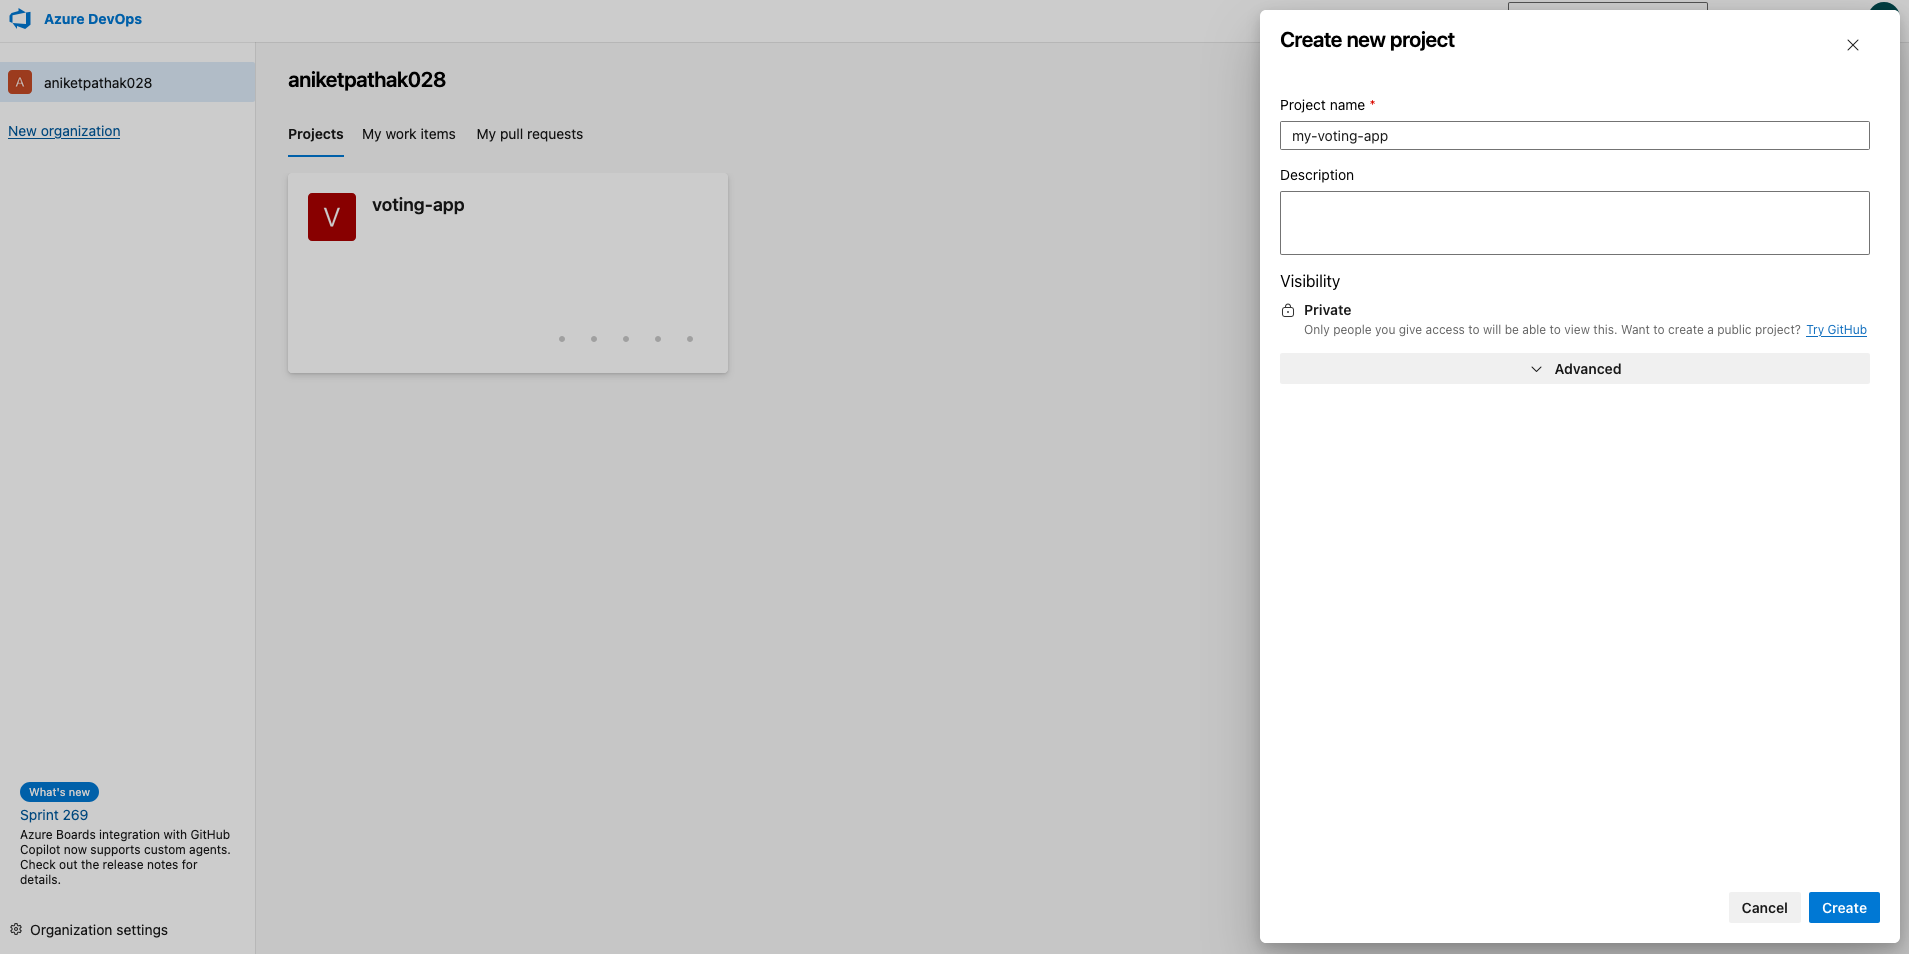
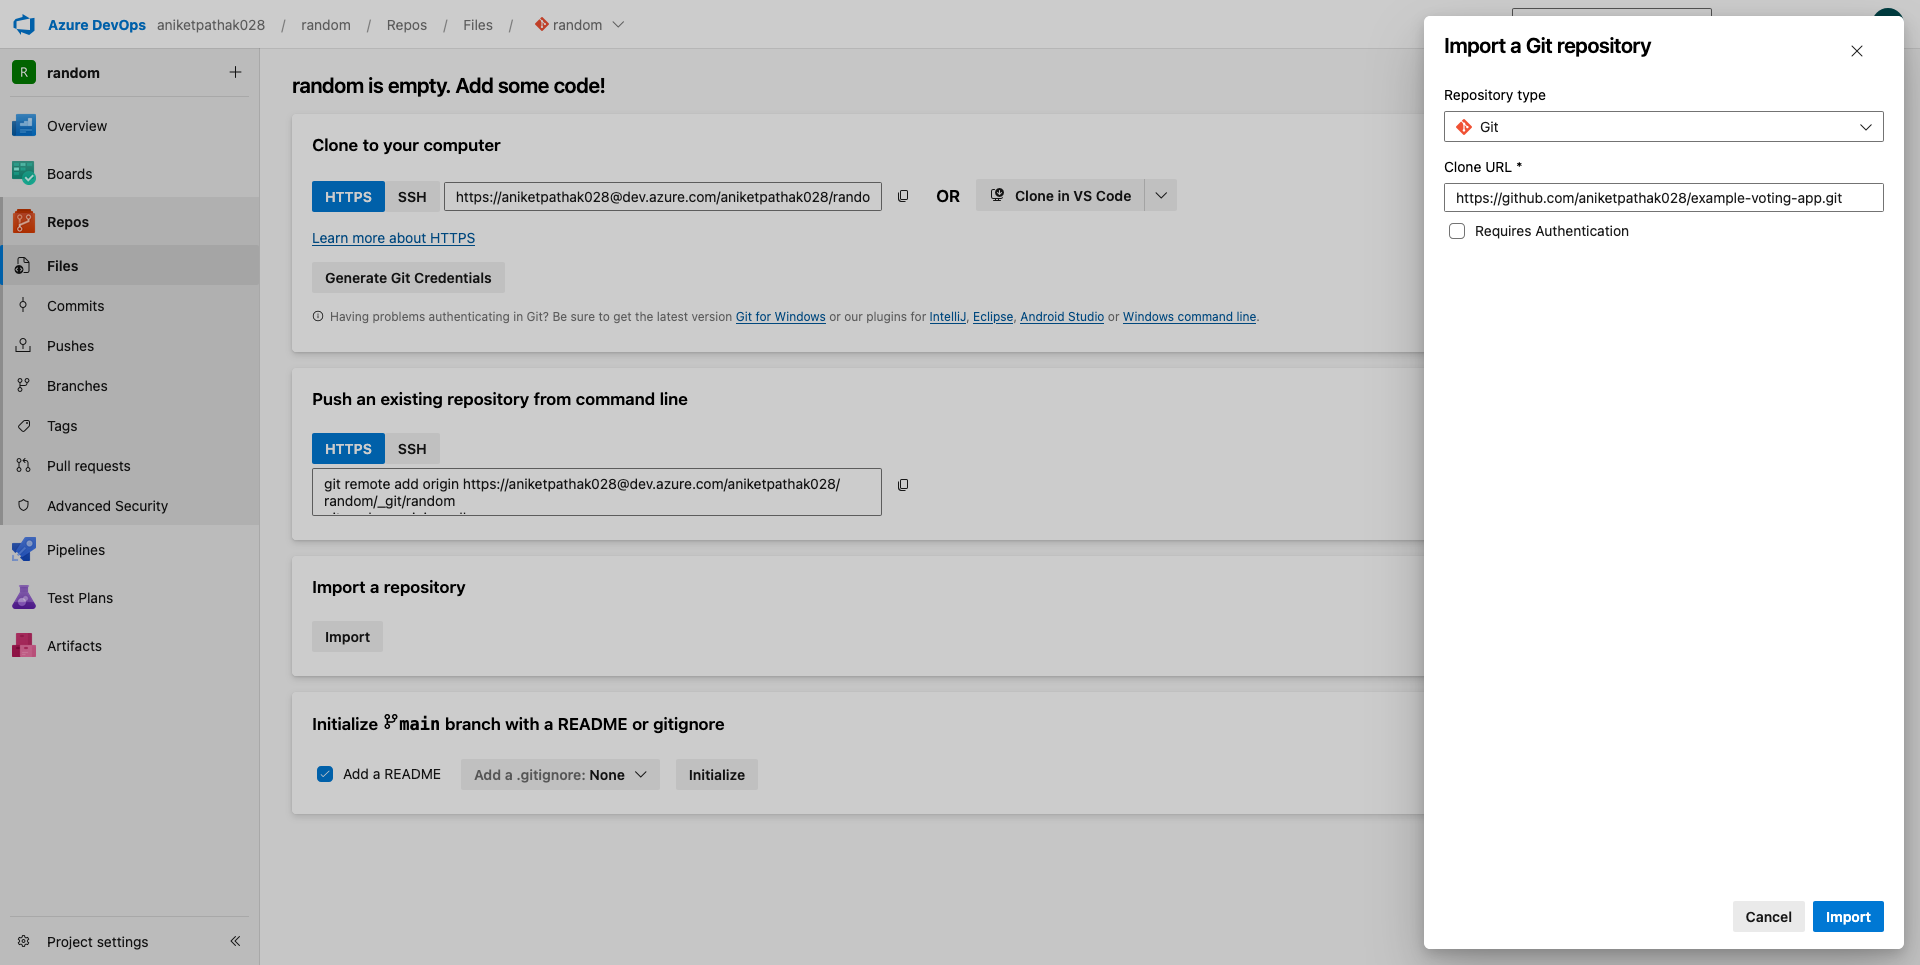
Step-2: Creating Azure DevOps project and setting up the repo
Create a new project in Azure DevOps
import the repository to Azure DevOps from GitHub using HTTPS or SSH
Note: Incase the main branch is not selected by default for the project go to branches and set the main branch as the default!
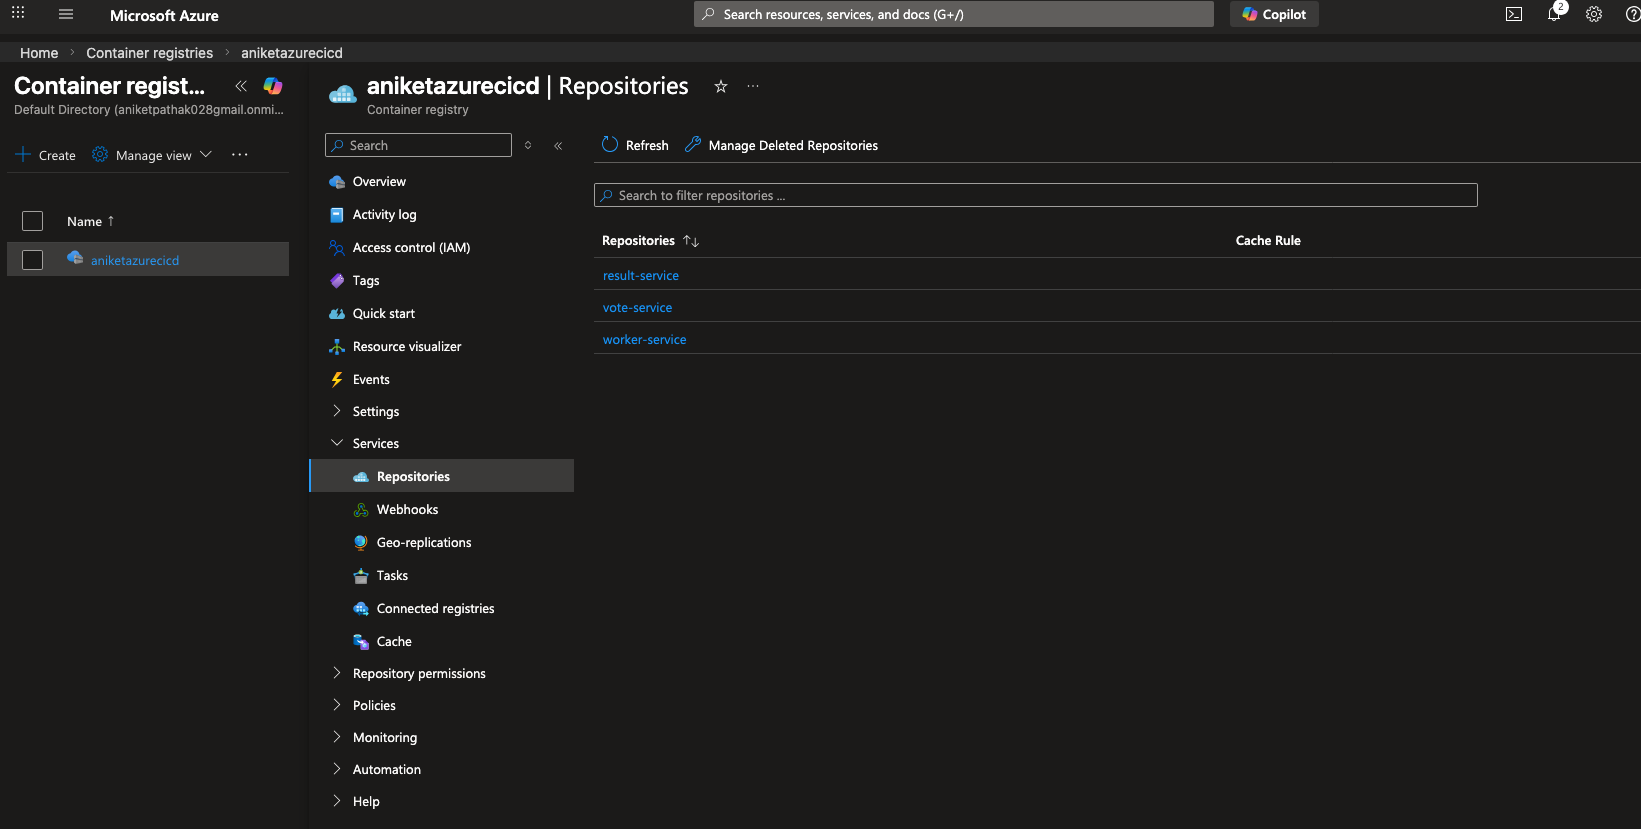
Step-3: Creating container registry in Azure portal
Before we start building our pipelines for the microservices which pushes the docker images into the Azure container registry, let’s create the registry first in Azure portal!
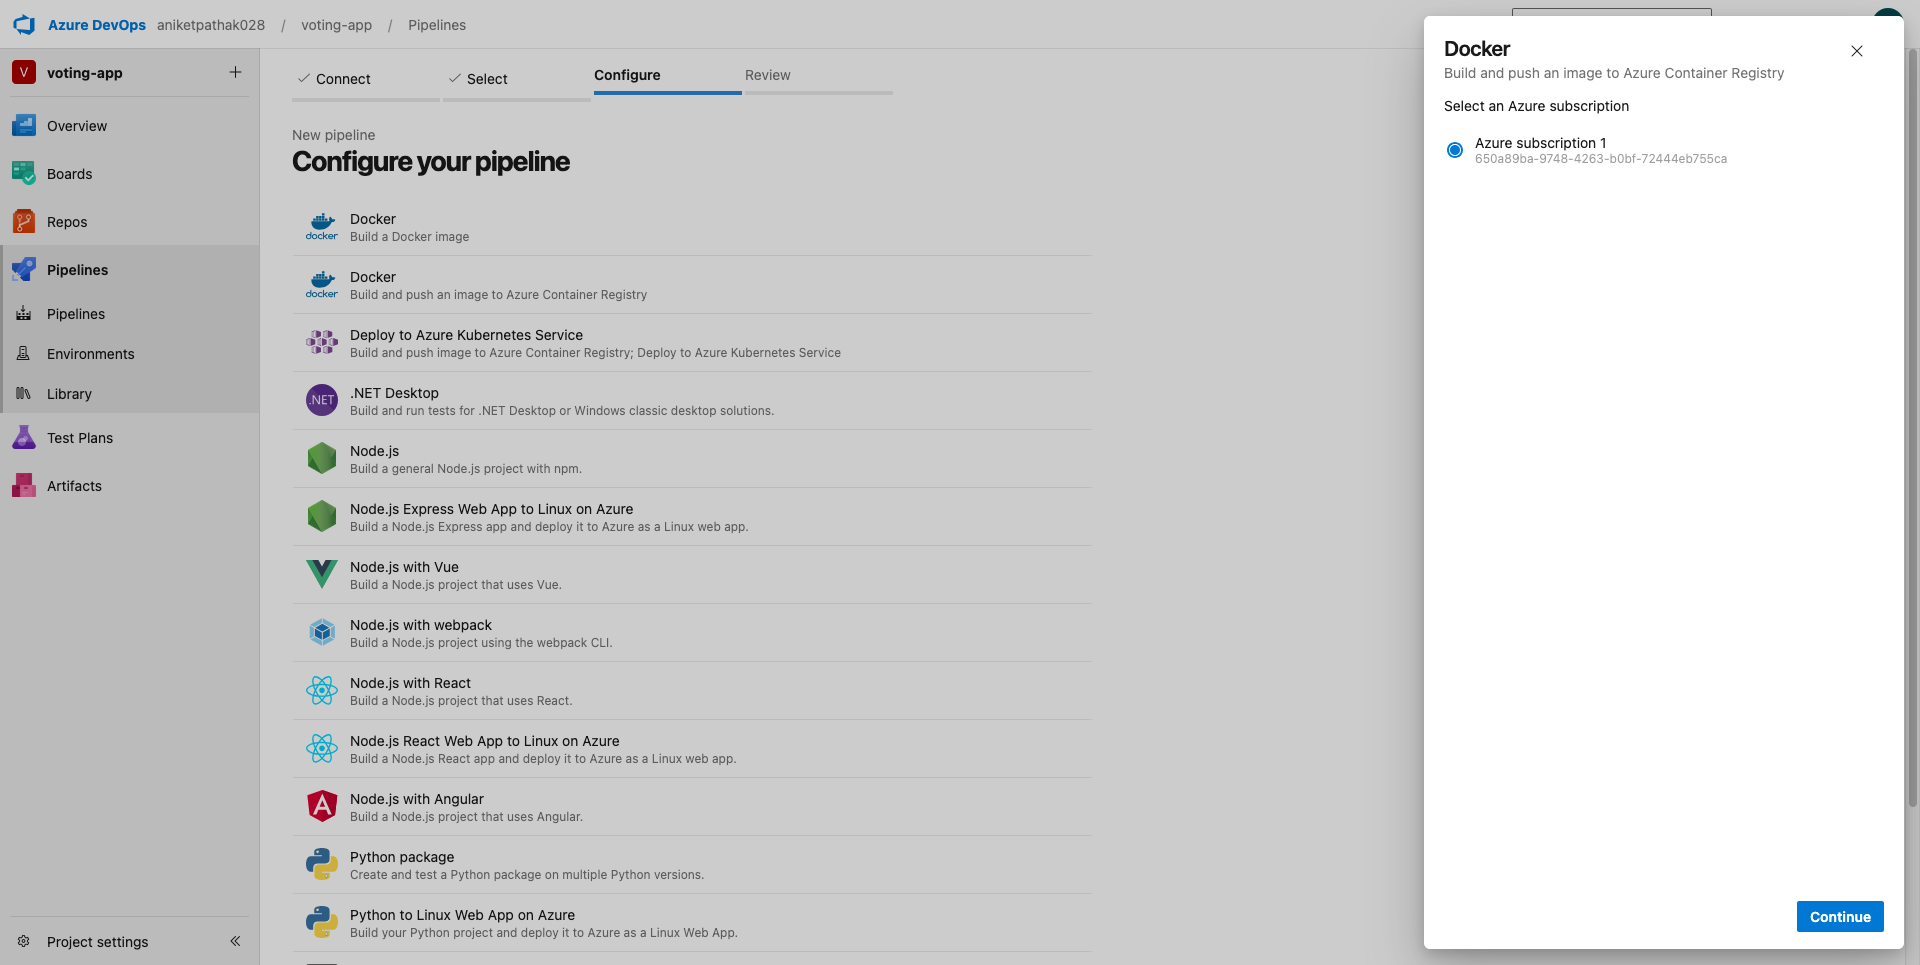
Step-4 Create a Pipeline for Voting microservice
Once the registry is created, simply go to Azure DevOps and create a pipeline for the project and choose the container registry created in Azure portal.
Once this pipeline is almost created, we get an autogenerated CI code, but we would like to modify it something like below:
# Docker# Build and push an image to Azure Container Registry# https://docs.microsoft.com/azure/devops/pipelines/languages/docker# path based trigger to build and deploy docker image for changes in voting microservice onlytrigger: paths: include: - vote/*resources:- repo: selfvariables: # Container registry service connection established during pipeline creation dockerRegistryServiceConnection: '284718ac-36e2-41fd-95cd-000cdff21b27' imageRepository: 'votingapp' containerRegistry: '<CONTAINER_REGISTRY_NAME>.azurecr.io' dockerfilePath: '$(Build.SourcesDirectory)/result/Dockerfile' tag: '$(Build.BuildId)'# this is an Azure VM which runs this pipeline - needs to be precreatedpool: name: 'azureagent'stages:- stage: Build displayName: Build jobs: - job: Build displayName: Build steps: - task: Docker@2 displayName: Build an image inputs: containerRegistry: '$(dockerRegistryServiceConnection)' repository: '$(imageRepository)' command: 'build' Dockerfile: 'vote/Dockerfile' tags: '$(tag)'- stage: Push displayName: Push jobs: - job: Push displayName: Push steps: - task: Docker@2 displayName: Push an image inputs: containerRegistry: '$(dockerRegistryServiceConnection)' repository: '$(imageRepository)' command: 'push' Dockerfile: 'vote/Dockerfile' tags: '$(tag)'
This is a CI for the voting microservice, which looks for changes in the voting microservice code and triggers a Docker build and push pipeline in Azure DevOps and this pipeline runs on a VM that we must create in Microsoft Azure beforehand. In this case the name of the VM is azureagent which we are now going to create in Azure.
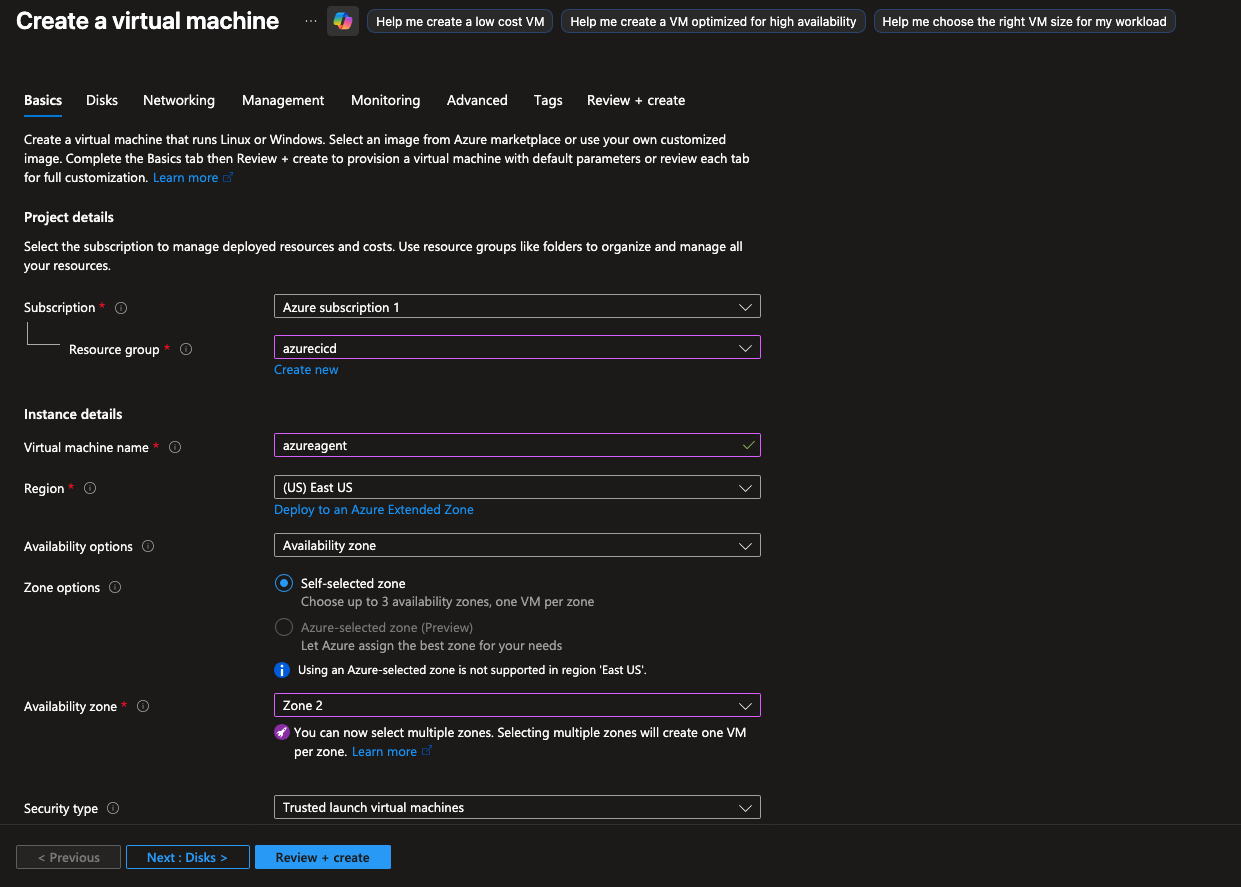
Step-5 Create an Azure VM
Simply create an Azure Virtual Machine and make sure to use the same resource group and name the virtual machine as referenced in the pipeline.
Note: Make sure to download the ssh key file (.pem) to authenticate while logging into the VM
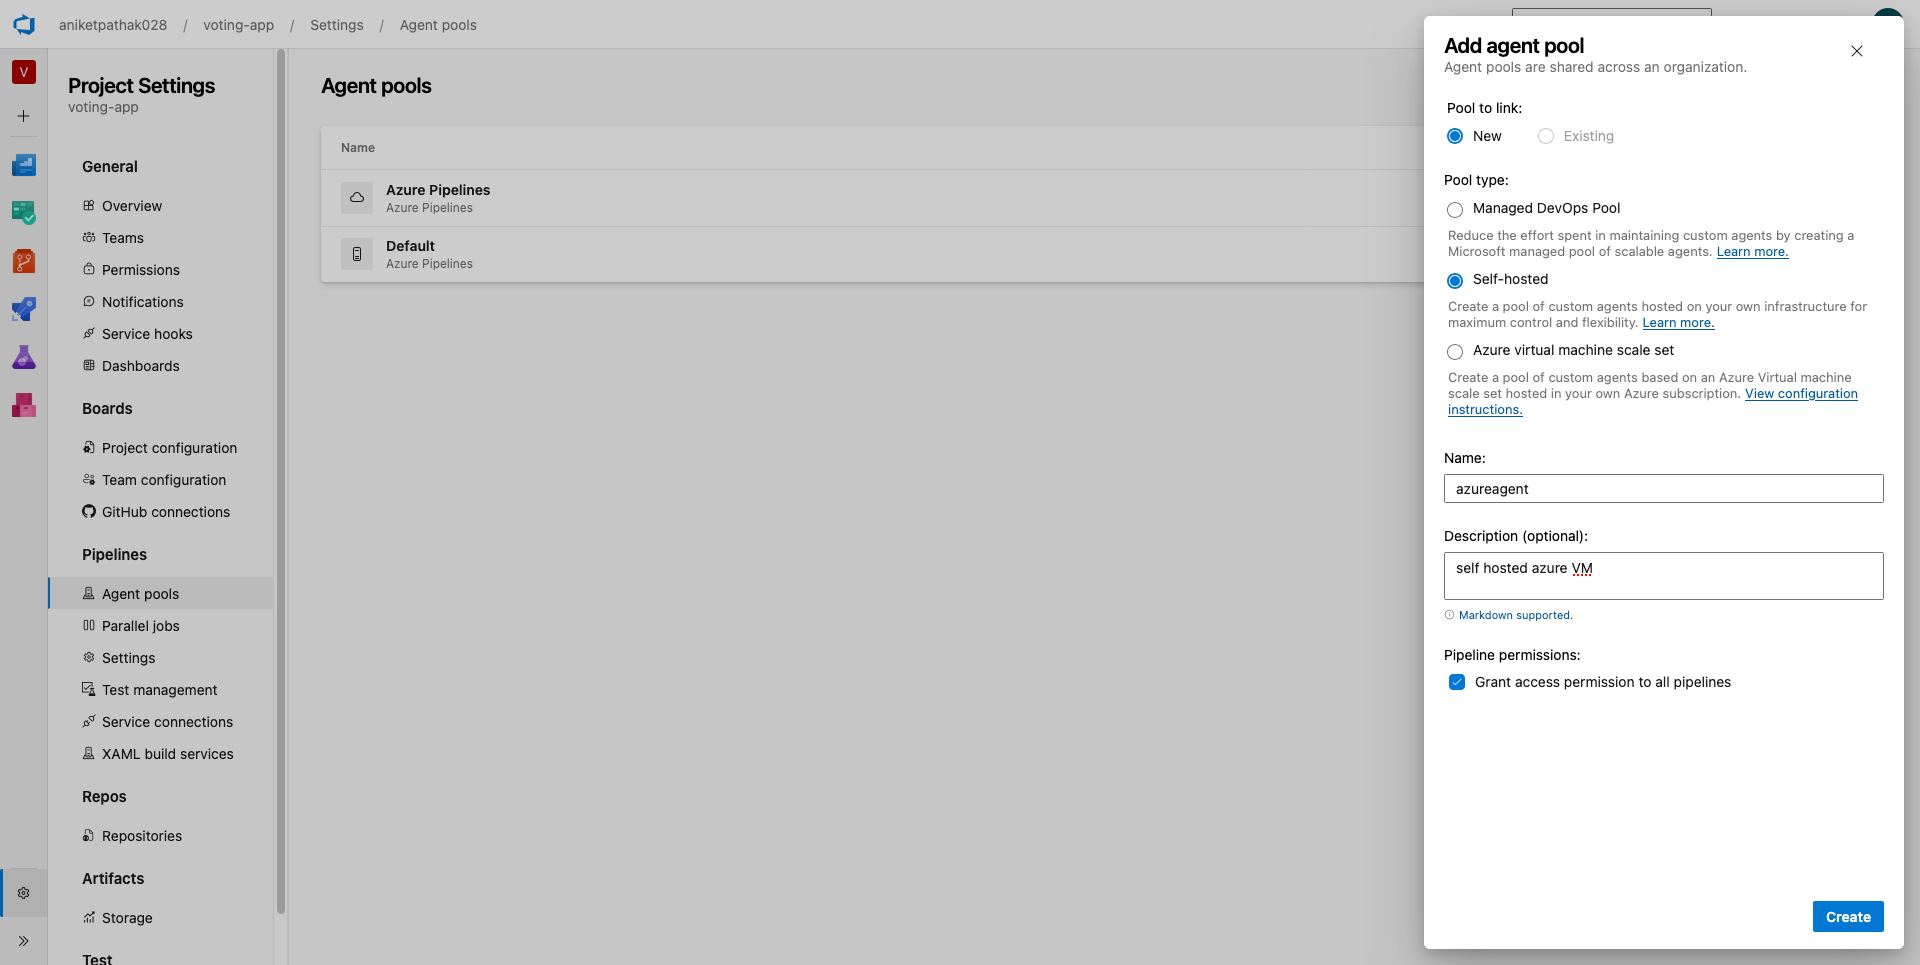
Step-6 Add this VM to the Azure DevOps agent pools
Now that we have created this Azure VM, we must create an Azure agentpool and add the VM into the pool.
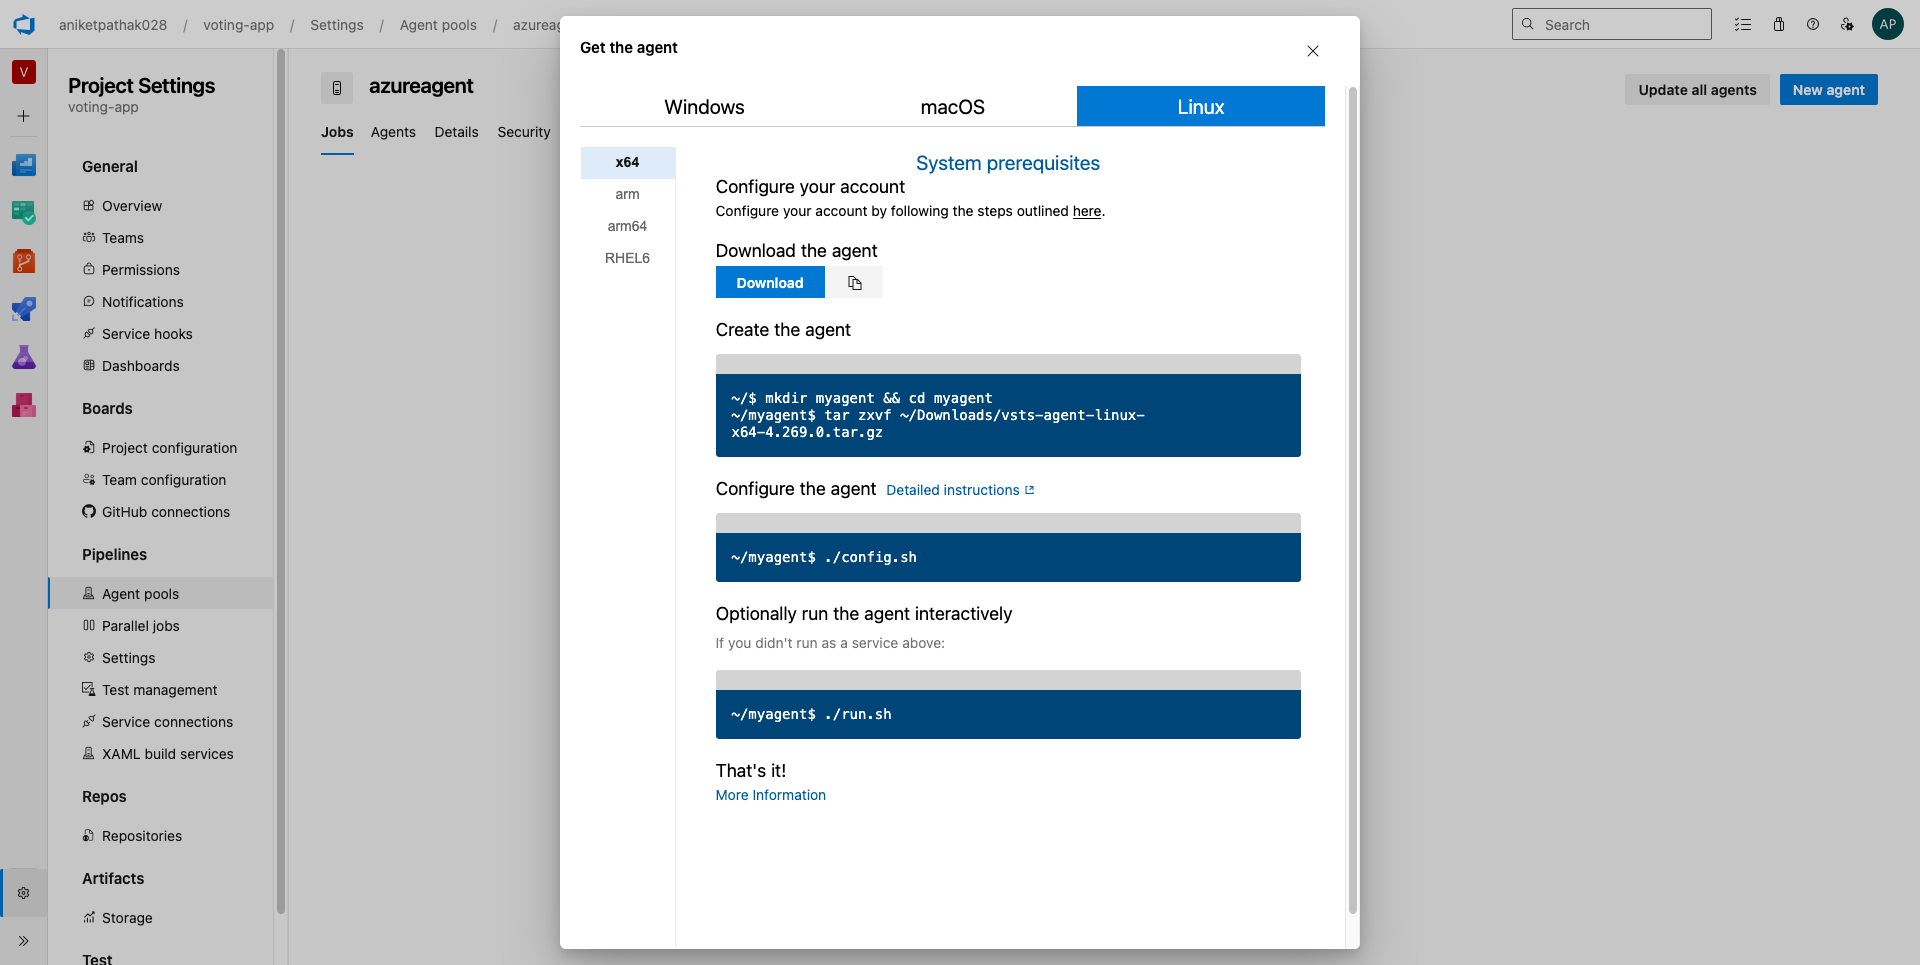
login to your Azure VM simply by copying its public ip address and run the commands provided in Azure DevOps platform to integrate this VM into the pool using the below commands:
Since this VM is going to build and run docker images, it must have docker installed and the agent user ie. azureuser in our case should have the privilege of running docker daemon.
Note: try testing docker by pulling a simple image like hello-world
docker pull hello-world
if it throws an error that permissions are denied to run the docker daemon, then restart the connection to the VM to resolve this!
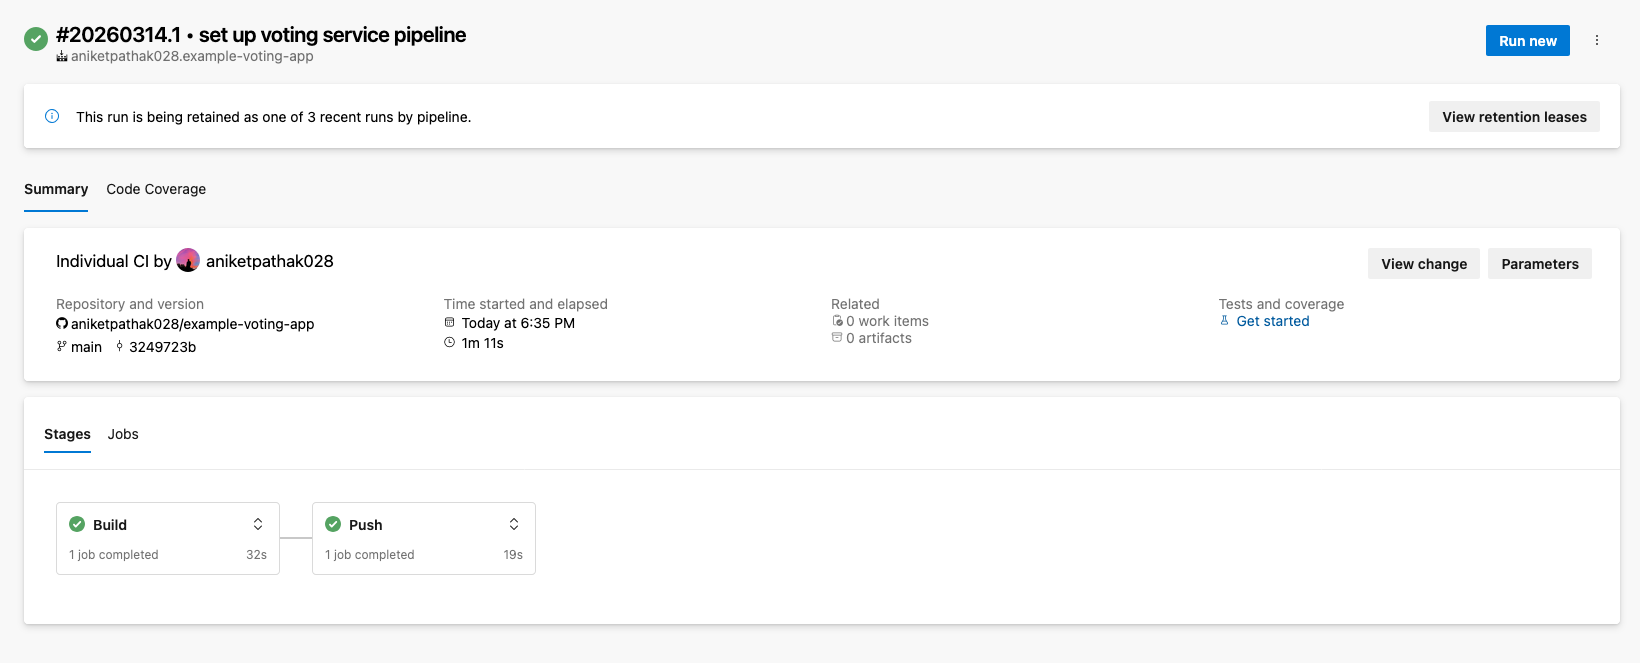
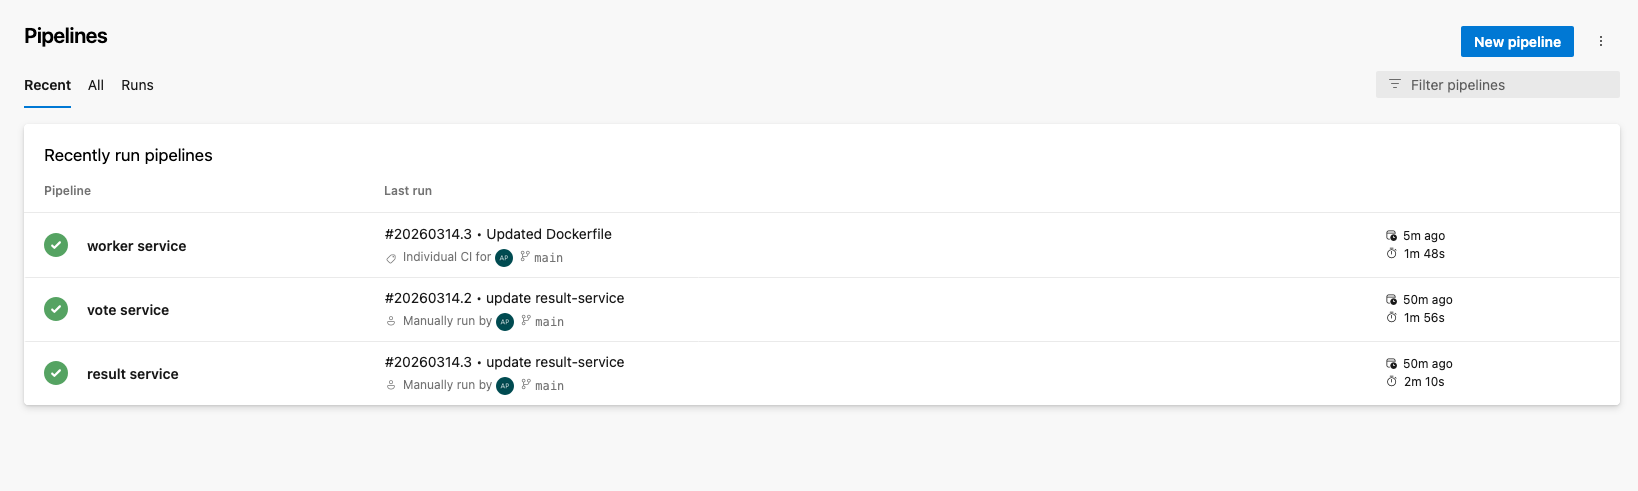
Once done, try changing anything minor inside the vote/* directory to test if the pipeline gets triggered automatically or just directly run the pipeline manually.
similarly create the pipelines for the other microservices ie. result and worker!
Note: when setting up a new pipeline always choose the source of the pipeline as the repository already imported in Azure!
congratulations! 🎉 we have successfully migrated our project to Azure CI and all our microservices are now getting built and pushed to Azure container registry!
Now that Continous Integration is successfull, let’s implement Continous Deployment with ArgoCD!
Continous Delivery
Before implementing the continous delivery part here is a brief explanation on the high level architecture of the same!
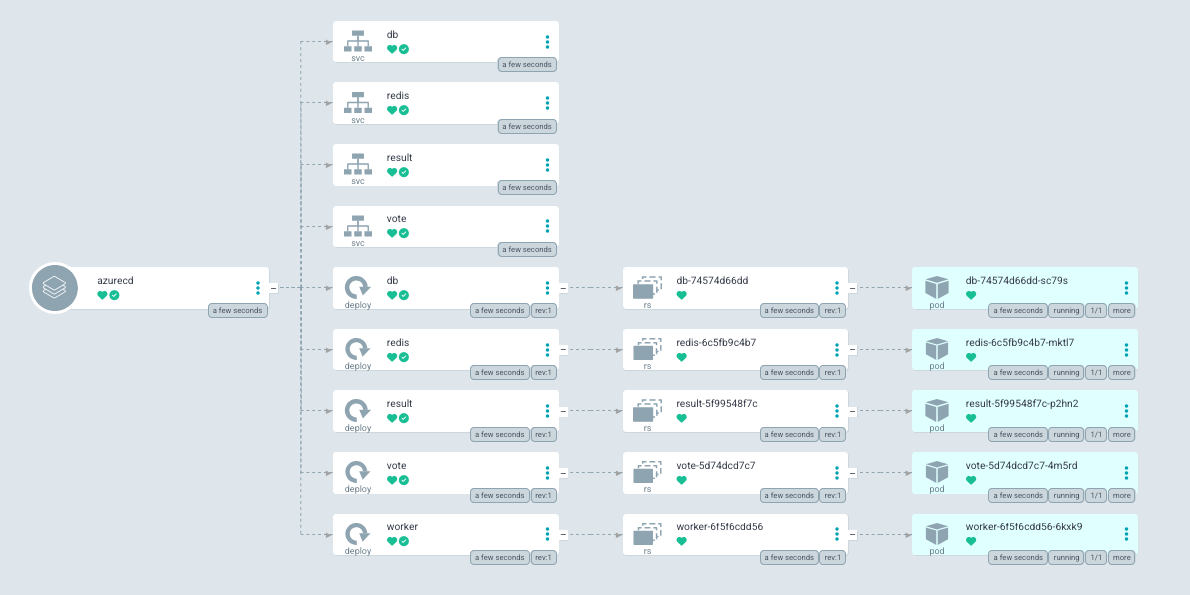
For continous delivery we would be using ArgoCD which will be monitoring for latest changes in the Azure container registry for the voting and result services docker images and the moment a new docker image is uploaded, it will trigger a change in the k8s specification of the deployment to use the latest image leading to a new deployment!
Since this project uses K8s to host the application, we are going to create an Azure K8s service in Azure to deploy the application!
Step-1 Create a managed AKS service
create a simple AKS service with default configurations and login to the cluster locally using the azure cli
az aks get-credentials --name "NAME_OF_YOUR_CLUSTER" --resource-group "RESOURCE_GROUP"kubectl get pods # to check the connection, should show no resource found in default namespace
Step-2: Setup ArgoCD in the AKS cluster
let’s set up ArgoCD in the AKS cluster now by simply running the below command
Now we need the login password for ArgoCD server, which can be found in the following way
# fetch the secrets in the argocd namespacekubectl get secrets -n argocd# open the argocd-inital-admin-secret in edit mode in vimkubectl edit secret argocd-inital-admin-secret -n argocd# copy the password ex in my caseaVZDMXdaVC1lQ2RYRHExSg== # delete this# decode the base64 encoded passwordecho aVZDMXdaVC1lQ2RYRHExSg== | base64 --decode<YOUR_DECODED_PASSWD># edit the argocd server config from ClusterIP to LoadBalancerkubectl get svc -n argocdkubectl edit svc argocd-server -n argocd
Now we can simply access the ArgoCD server directly by visiting https://<EXTERNAL_IP>:<PORT_NUMBER> for example in my case - https://20.19.14.130:30367
kubectl get svc argocd-server -n argocd
Note: the username is admin by default and the password is the decoded base64 without %
Note: Incase this doesn’t work, it maybe beacause the inbound port does not have the permission, in that case just go to Azure portal and in vmms resource select the VM
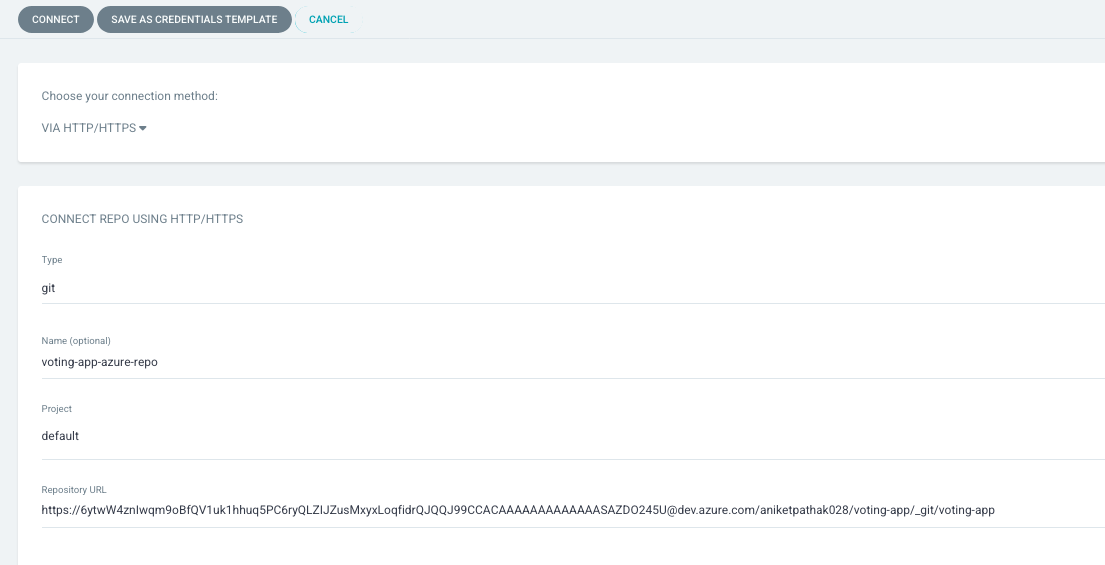
Step-3 Connecting ArgoCD to Azure DevOps repository
Now that ArgoCD is setup on our AKS cluster, we can connect it with our Azure DevOps repository so that it can monitor the changes in the K8s manifest files and quickly deploy any new changes into the cluster!
Note: for the repository url first copy it from the Azure DevOps portal in the repo and just replace the organization name with the personal access token instead
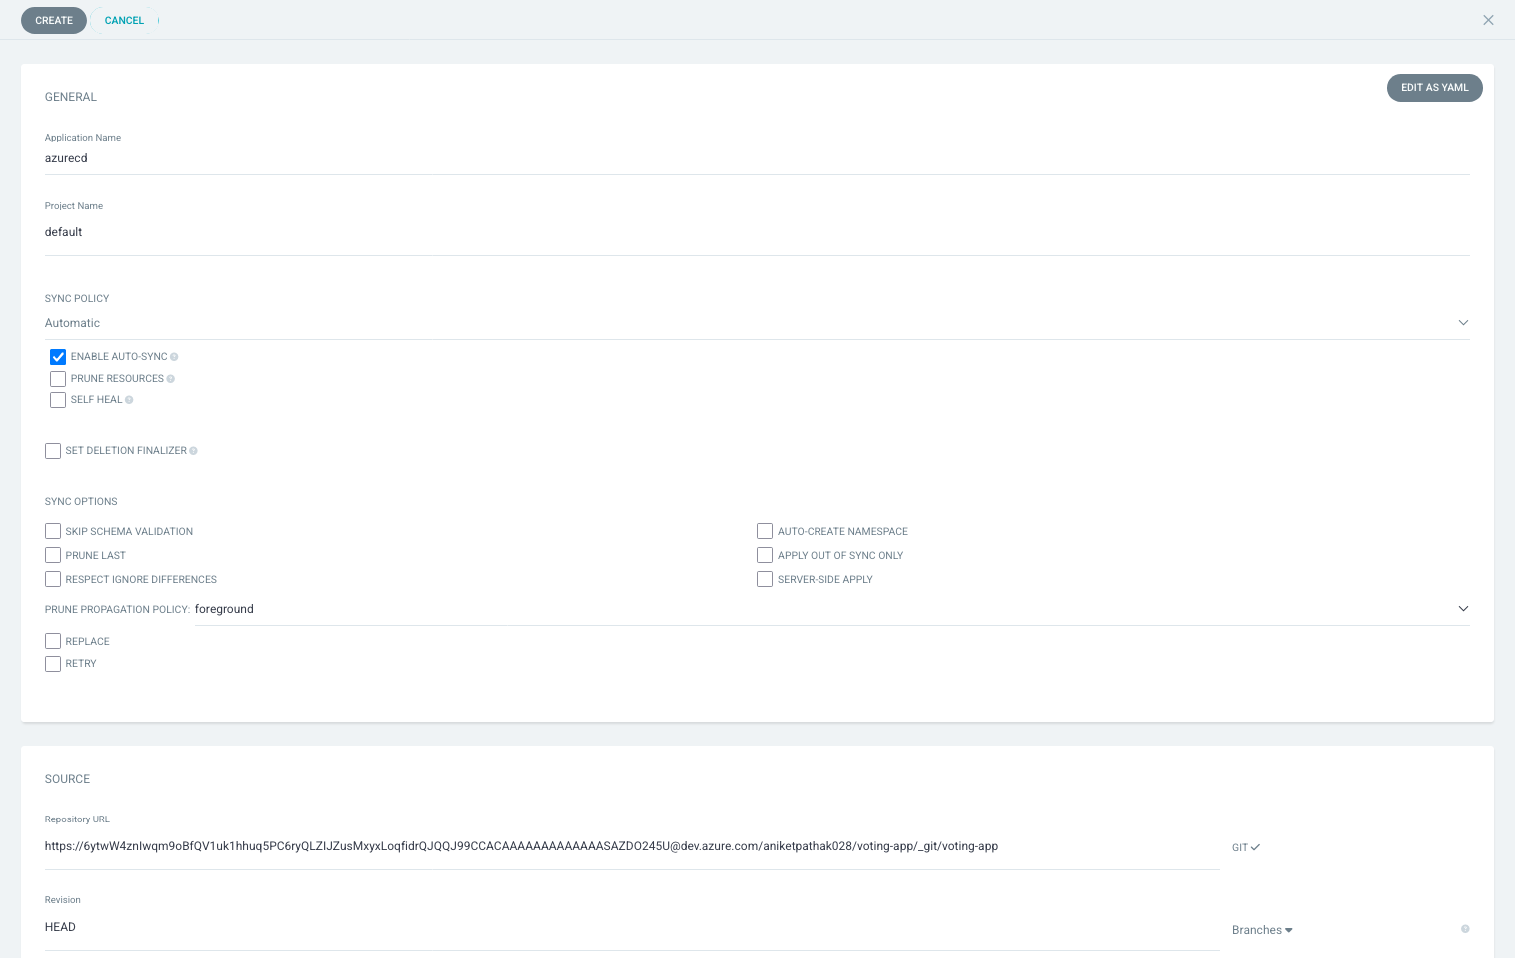
Now let’s create a new application in ArgoCD to track our repo manifest files
Note:
Sync Policy should be automatic if you don’t want to manually trigger a deployment
Also by default ArgoCD takes 180 sec to detect a change in the repository before pushing for a new deployment, which can be changed in the configuration!
The path should be the path to the K8s manifest folder
Once completed click on create to have an ArgoCD application
Step-4: Adding update step in the pipeline to trigger ArgoCD
Now that we have our ArgoCD looking for K8s manifest changes, we must add an update step in our Azure pipeline, so that whenever the pipeline is triggered it makes sure to update the manifest file with the latest docker image as well!
This can be achieved using a simple shell script :)
#!/bin/bash# run the script in debug mode to catch errors!set -x# Set the repository URLREPO_URL="https://<ACCESS-TOKEN>@dev.azure.com/<AZURE-DEVOPS-ORG-NAME>/voting-app/_git/voting-app"# Clone the git repository into the /tmp directorygit clone "$REPO_URL" /tmp/temp_repo# Navigate into the cloned repository directorycd /tmp/temp_repo# Make changes to the Kubernetes manifest file(s)# For example, let's say you want to change the image tag in a deployment.yaml file# $1 -> which manifest file to make changes to - db, redis, vote, result, worker# $2 -> repository name in azure container registry - vote-service, result-service, worker-service# $3 -> build tag or build numbersed -i "s|image:.*|image: <ACR-REGISTRY-NAME>/$2:$3|g" k8s-specifications/$1-deployment.yaml# Add the modified filesgit add .# Commit the changesgit commit -m "Update Kubernetes manifest"# Push the changes back to the repositorygit push# Cleanup: remove the temporary directoryrm -rf /tmp/temp_repo
This script can be placed in our Azure repo inside a folder scripts, and can be triggered as a part of update step in the pipeline!
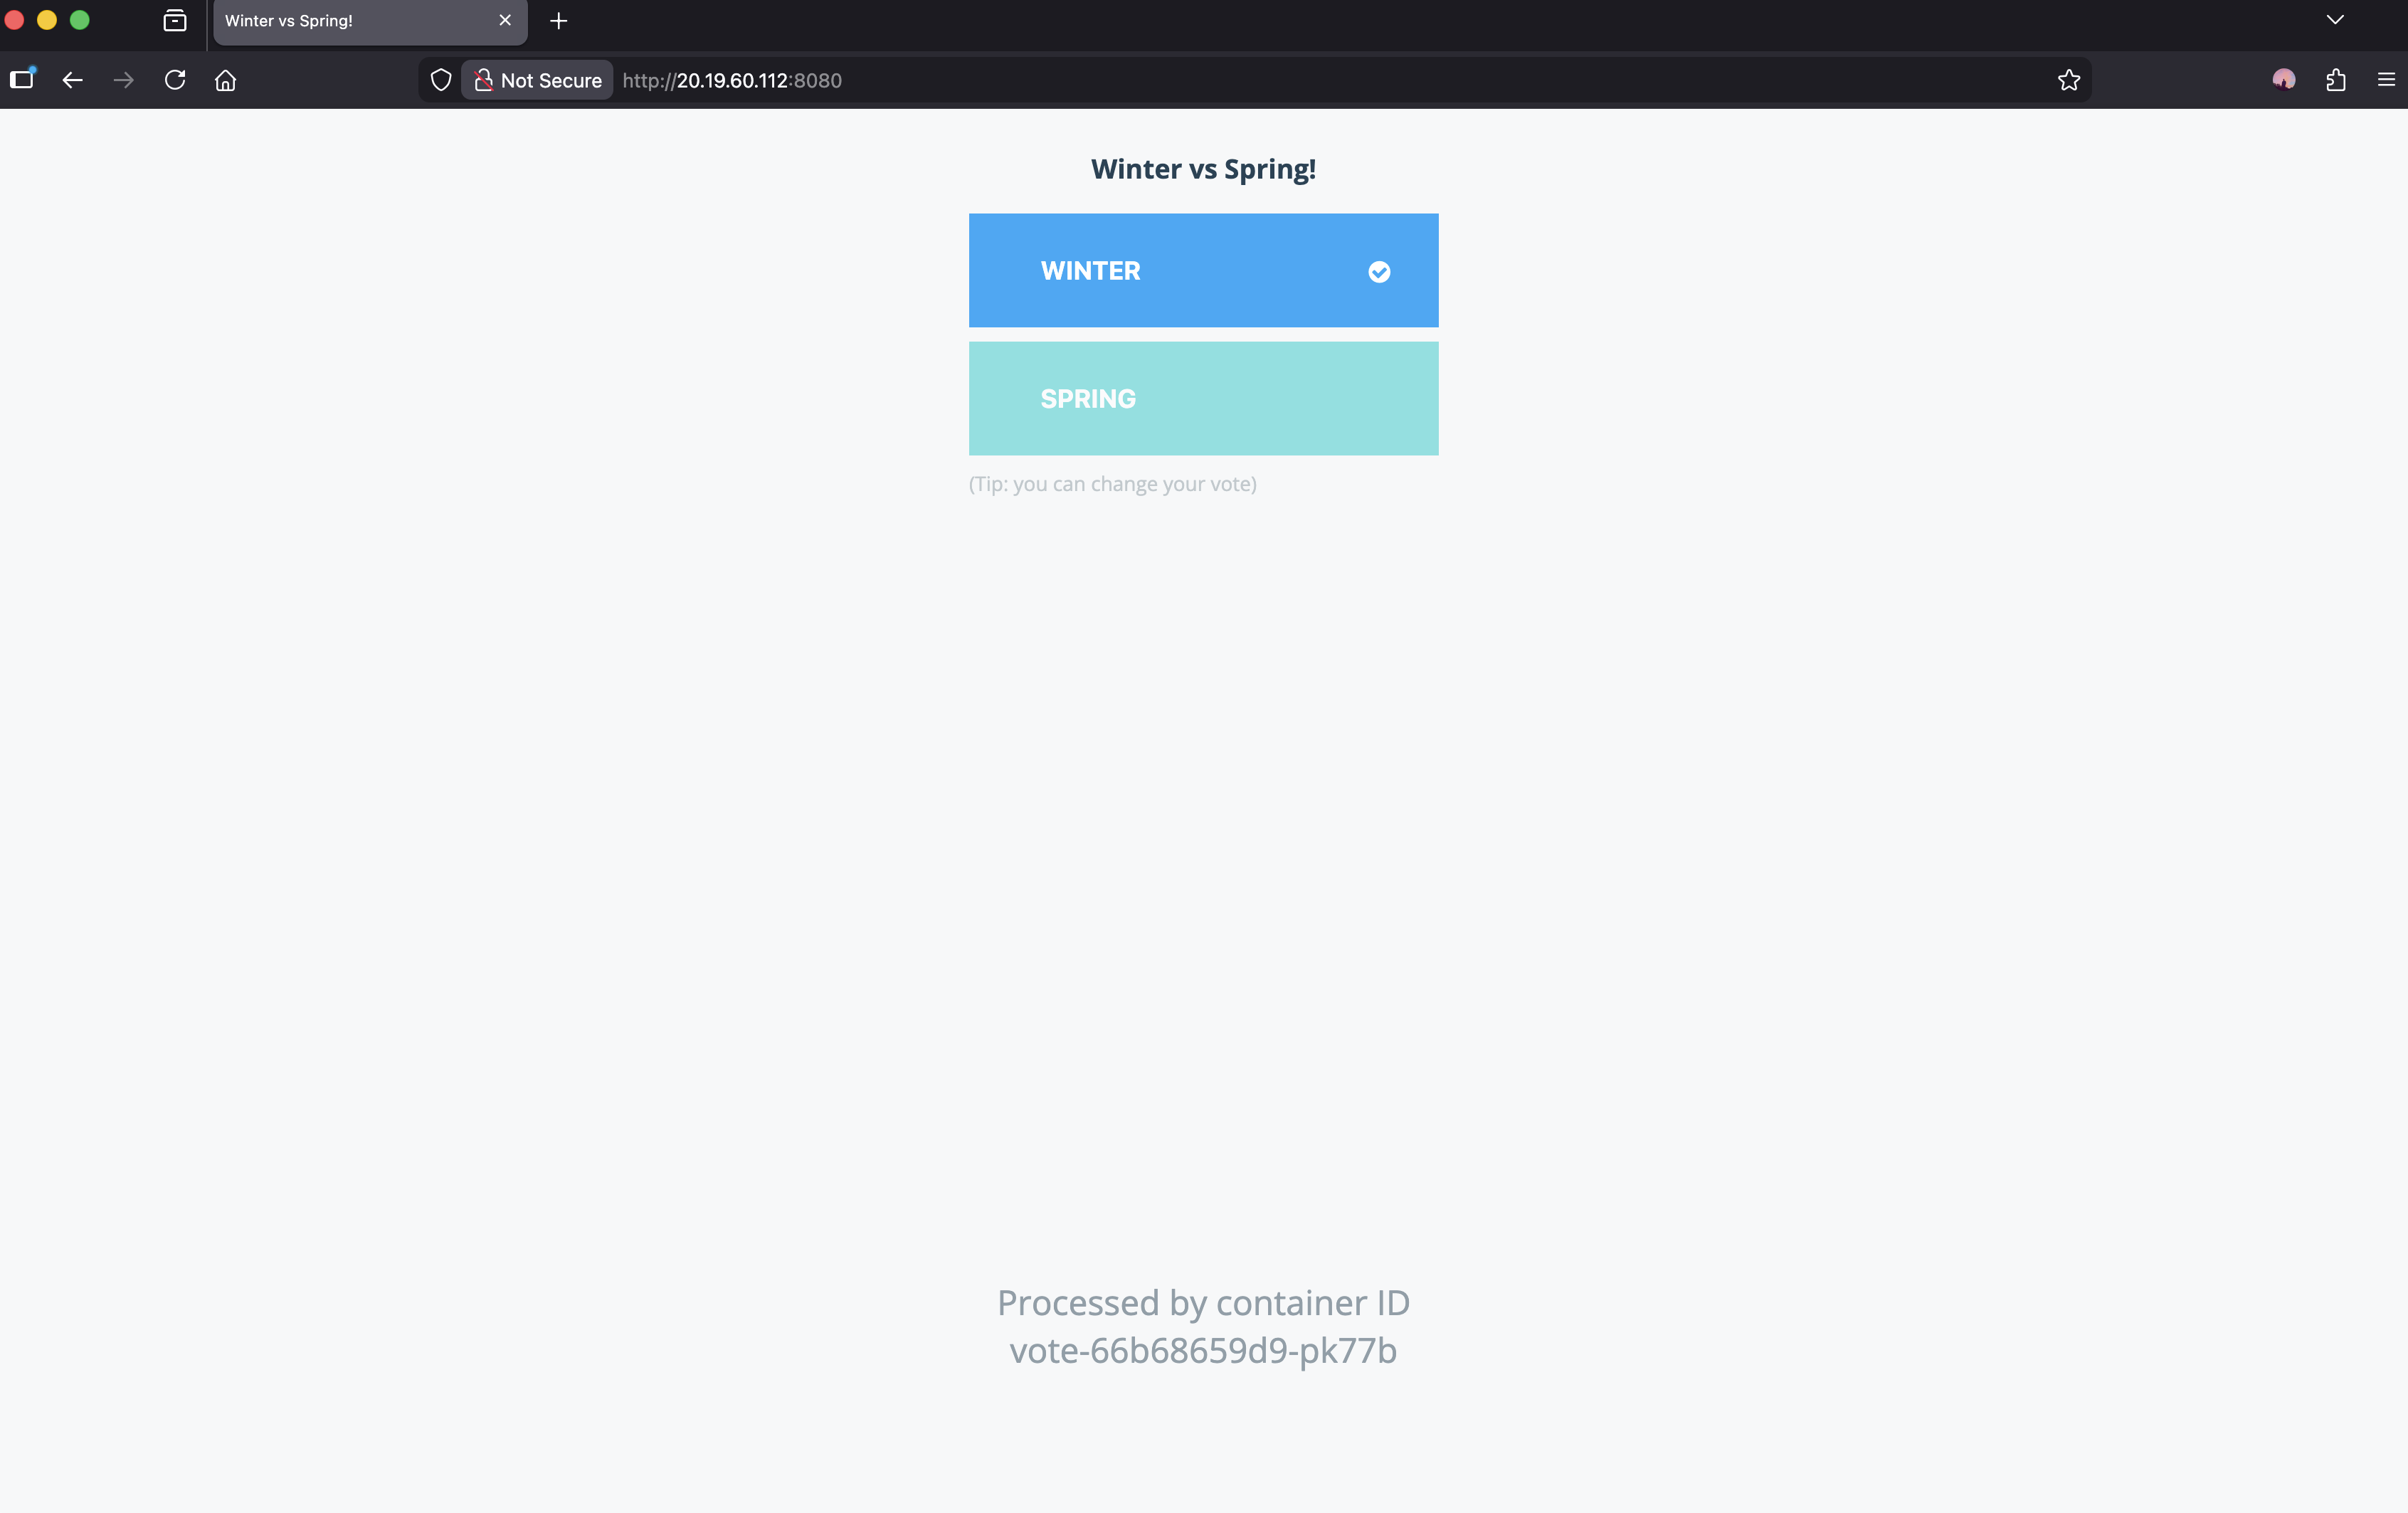
Now, to test if the entire lifecycle is working or not we can simple update the vote codebase and check it! Let’s change the options of the poll to “Spring” and “Winter” and test if the change is reflected in the website or not! Currently the website looks like this:
But there is one small issue which is although the entire CI/CD works and the image is updated, our container registry is private hence K8s cannot pull the docker image hence we get an error here:
❯ k get podsvote-99cdd4ddb-mm8jj 0/1 ImagePullBackOff 0 45m
Step-5 ImagePullSecrets
Since K8s needs to authenticate to our container registry, we can use the concept of ImagePullSecrets, which is a secret to access the container registry!
Let’s create the K8s secret in the default namespace where the application is deployed!
First get the access key from the container registry
Create an ImagePullSecret in the K8s cluster in the namespace where the application is deployed
Note: We can get the docker-username and docker-password in the ACR access keys in Azure portal and use them in the secret to authenticate while K8s pulls the image from the registry!
Step-6 Final Test
after making the above change just delete the pod in AKS, and let it rebuild the pod with the new image:
Woohooo! We have successfully created an entire CI/CD pipeline that checks for any code changes in the microservices, triggers an Azure Pipeline to rebuild a docker image and store them in the ACR and a custom shell script to update the K8s manifests in the pipeline to trigger a deployment using ArgoCD!
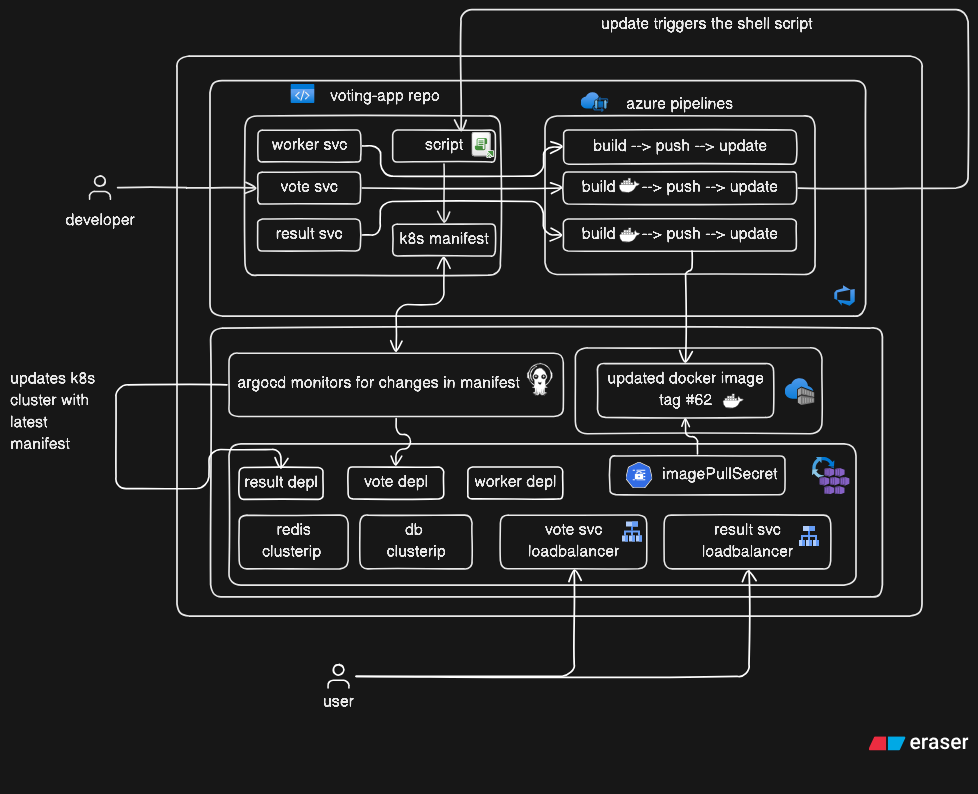
Here is a complete Architecture Diagram for this entire project that I created using eraser.io!